MITM Attack And Packet Sniffing Using ettercap
What Is MITM Attack :-
A man in the middle attack (MITM) attack is general term for when a perpetrator positions
himself in a conversation between a user and an application-either to eavesdrop or to
impersonate one of the parties, making it appear as if a normal exchange of information is
underway.
The goal of an attack is to steal personal information, such as login credentials, account details
and credit card numbers. Targets are typically the users of financial applications, Saas
businesses, e-commerce sites and other websites where logging in is required.
Broadly speaking, a MITM attack is the equivalent of a mailman opening your
bank statement, writing down your account details and then resealing the envelope
and delivering it to your door.
When any data has to be transmitted over the computer network, it is broken down in smaller
part at the sender's node called data packets and reassembled at receiver's node in original
format. It is the smallest unit of communication over a computer network. It is also called a
block, a segment, a datagram or a cell. The act of capturing data packet across the computer
network is called packet sniffing. It is mostly used by crackers and hackers to collect
information illegally about network. It is also used by ISPs, advertisers and government.
Requirements :-
Kali Linux
Steps :-
Step :-1 Finding IP address of your Windows System and router's IP.
Open CMD and type ipconfig. We want IPv4 address of our system and router's IP
which is Default Gateway.
Step:- 2 Then open terminal as root or default in Kali Linux.
If you open terminal as default then type following command.
- sudo ettercap -G
Otherwise
- ettercap -G
Step:- 3 Open
Wireshark in terminal using above condition
- wireshark
Then select option which connection
you have
Step:-
4 Then open ettercap terminal and open the menu by
ettercap menu > hosts >
scan for host
Then
get hostlist by
ettercap menu > hosts > hostlist
Then select router’s IP address and
add that to Target1 then select target
System IP address and add that to Target2. Like above Image.
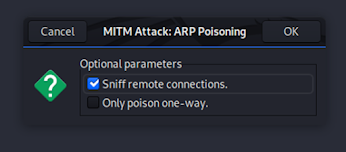
Step:- 5 Select ARP poisoning attack by
MITM
attack > ARP poisoning
And then select Sniff remote connections.
Step:- 6 Now we’ve poisoned the network address
pf target systems, and
all traffic must now pass through us. We can see all the packets data
etc.
After this open HTTP website for testing. Here I am using below website.
http://testphp.vulnweb.com/login.php
You can also use it by clicking on the link.
Step:- 7 The username and password entered
will be shown in Kali Linux terminal
like.
You can also see the packets in
Wireshark by using the filters
You
can also see the packets in Wireshark by using the filters
THNAK YOU !!!


Comments
Post a Comment